
Setting up an AWS VPC
What is a VPC
Amazon Virtual Private Cloud (Amazon VPC) is a service that lets you launch AWS resources in a logically isolated virtual network that you define. You have complete control over your virtual networking environment, including selection of your own IP address range, creation of subnets, and configuration of route tables and network gateways. You can use both IPv4 and IPv6 for most resources in your virtual private cloud, helping to ensure secure and easy access to resources and applications.
Amazon VPC concepts
Amazon VPC is the networking layer for Amazon EC2. If you’re new to Amazon EC2, see What is Amazon EC2? in the Amazon EC2 User Guide for Linux Instances to get a brief overview.
The following are the key concepts for VPCs:
- Virtual private cloud (VPC) — A virtual network dedicated to your AWS account.
- Subnet — A range of IP addresses in your VPC.
- Route table — A set of rules, called routes, that are used to determine where network traffic is directed.
- Internet gateway — A gateway that you attach to your VPC to enable communication between resources in your VPC and the internet.
- VPC endpoint — Enables you to privately connect your VPC to supported AWS services and VPC endpoint services powered by PrivateLink without requiring an internet gateway, NAT device, VPN connection, or AWS Direct Connect connection. Instances in your VPC do not require public IP addresses to communicate with resources in the service. Traffic between your VPC and the other service does not leave the Amazon network. For more information, see AWS PrivateLink and VPC endpoints.
- CIDR block —Classless Inter-Domain Routing. An internet protocol address allocation and route aggregation methodology.
How to set up a VPC
(https://docs.aws.amazon.com/directoryservice/latest/admin-guide/gsg_create_vpc.html)
You can create, access and manage you VPCs using the following interfaces:
- AWS Management Console: Provides a web interface that you can use to access your VPCs.
- AWS Command Line Interface (AWS CLI): Provides commands for a broad set of AWS services, including Amazon VPC, and is supported on Windows, Mac, and Linux. For more information, see AWS Command Line Interface.
- AWS SDKs: Provides language-specific APIs and takes care of many of the connection details, such as calculating signatures, handling request retries, and error handling. For more information, see AWS SDKs.
- Query API: Provides low-level API actions that you call using HTTPS requests. Using the Query API is the most direct way to access Amazon VPC, but it requires that your application handle low-level details such as generating the hash to sign the request and error handling. For more information, see the Amazon EC2 API Reference.
How do Amazon VPCs work?
Amazon Virtual Private Cloud (Amazon VPC) enables you to launch AWS resources into a virtual network that you’ve defined. This virtual network closely resembles a traditional network that you’d operate in your own data center, with the benefits of using the scalable infrastructure of AWS.
How to create a VPC:
Creating a VPC using the wizard
Execute the following steps to create a VPC using the wizard:
- Open the VPC dashboard from within the AWS Management Console.
- Select the Orange Launch VPC Wizard button:

- Proceed to select your VPC Configuration. As you can see there are 4 options available to configure a VPC
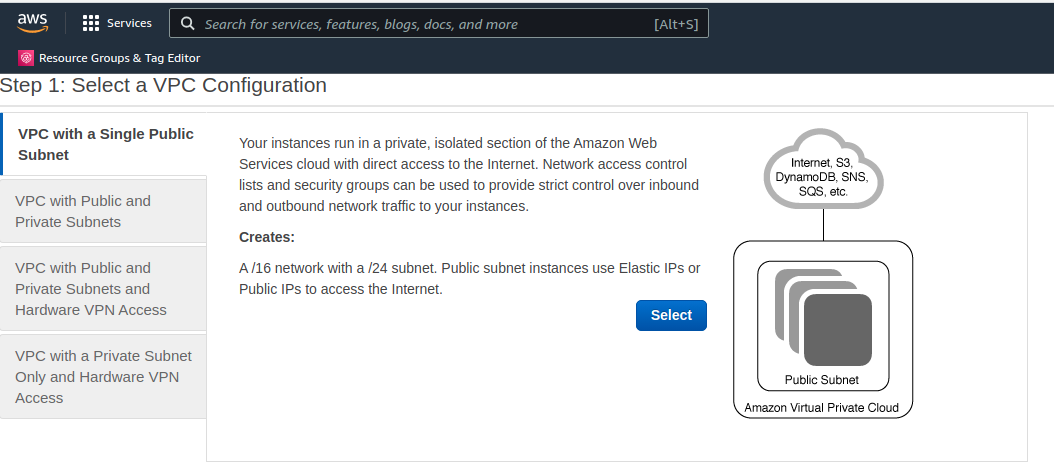
- For this demonstration, select VPC with a Single Public Subnet and click Select.
To clarify at this point, a public subnet is a subnet that is reachable by the internet. So any resources within that subnet can reach out to internet traffic and also receive internet traffic. How this is configured and the components used will be discussed when we manually configure a VPC. For now, let’s complete the wizard.
- You are now presented with the following page, where you are asked to provide additional configurable parameters that will dictate how your VPC and public subnet are configured from a CIDR block perspective. CIDR stands for Classless Inter-Domain Routing and defines the IP address ranges of your VPC and potential subnets:


- In the first section at the top, enter the size of your CIDR block, which must be between /16 and /28. If you want to use an IPv6 CIDR block range, then this will be allocated by AWS. Also, add a name for your VPC.
- Next, configure the CIDR block for your public subnet (remember, this wizard will configure a single public subnet). Select the Availability Zone of your public subnet. Be aware that subnets are not able to span more than one Availability Zone. Add a name for your subnet.
- Now add a service endpoint if required. A service endpoint allows you to connect to services that sit outside of your VPC, such as S3 or DynamoDB, without traversing the internet. Instead, an interface would be created within your VPC to directly connect to the service using only the internal AWS network.
- Select whether you would like to enable DNS hostnames or not.
- Select the tenancy required. The available tenancy options include Default or Dedicated. Default tenancy means that the underlying host hardware of your instances run within your VPC will be shared with other customers. Dedicated tenancy ensures that only your account will be using the underlying host hardware of your instances and not sharing it with anyone else. You might need this option for specific compliance reasons.
Finally, select Create VPC.
AWS will now create the VPC and the associated public subnet, which will also include components such as an IGW, route tables, NACLs, and many more automatically. So let’s first take a look at these components and what they are. This will give you a much deeper insight into how to implement security across your environment.
Reference Guides:
https://docs.aws.amazon.com/vpc/latest/userguide/what-is-amazon-vpc.html